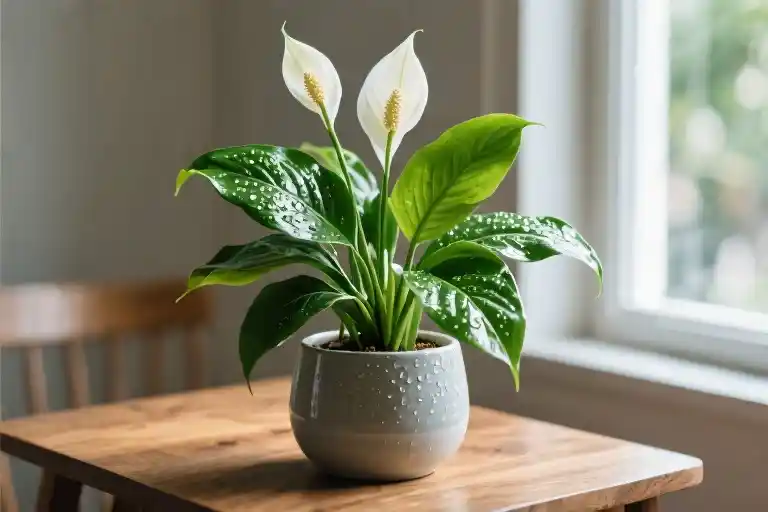
The peace lily sits quietly in your living room, its glossy leaves drooping slightly despite your best efforts. You watered it just last week, maybe too much? Or was it the spot by the sunny window that made those brown patches appear? If this sounds familiar, you’re not alone – these elegant plants often suffer from what I call ‘kindness overload,’ where our good intentions accidentally become their worst enemies.
What makes peace lilies particularly tricky is how they communicate distress. Unlike dramatic ferns that crisp up overnight or succulents that visibly shrivel, these plants send subtle signals – a yellow leaf here, a missed flowering cycle there. The good news? Once you understand their basic language, they’re remarkably resilient. I’ve nursed enough neglected office plants back to health to know that with a few adjustments, yours can thrive too.
Let’s start with the five non-negotiable rules distilled from years of trial and error:
- Bright but indirect light – Think dappled sunlight, not beach vacation
- Consistent moisture – Like a wrung-out sponge, never soggy
- Humidity hugs – Their tropical roots crave moist air
- Seasonal feeding – Less in winter, like bears hibernating
- Safety first – Beautiful but toxic to curious pets and kids
Notice how none of these involve complex equipment or PhD-level botany. The magic lies in consistency rather than perfection. That east-facing windowsill you pass every morning? Probably perfect. That half-finished bottle of filtered water in your fridge? Ideal for hydration.
What often gets missed in care guides is the plant’s adaptability. I’ve seen peace lilies bounce back from near-death experiences when given proper light and corrected watering. Their white blooms (technically spathes) might take a season to reappear, but the foliage alone makes a striking statement. If yours hasn’t flowered, don’t panic – sometimes they just need time to settle in, like a new roommate adjusting to your routines.
The sections ahead will walk through each element, but remember this: your peace lily isn’t judging you. Those brown tips? Just memos about adjustments needed, not failures. Start with the light situation today – that’s the easiest win – then gradually implement other changes. Before you know it, you’ll develop that intuitive sense all plant parents cherish, where a glance at the soil or leaves tells you exactly what’s needed.
Light: The Peace Lily’s Energy Source
Peace lilies speak through their leaves. When positioned correctly, those glossy green blades stand tall with quiet confidence. But get the lighting wrong, and you’ll witness a dramatic performance of drooping and discoloration. These plants don’t just want light – they need the right kind of light, much like we need balanced nutrition rather than empty calories.
Bright, indirect light serves as the sweet spot for peace lilies. An east-facing window provides the ideal morning glow – gentle yet energizing. The leaves will turn toward this light source like sunflowers, though with more subtlety. North-facing windows also work well, offering consistent but diffused illumination throughout the day. I’ve kept peace lilies in both locations and noticed the east-facing plants tend to produce more flowers, while the north-facing ones develop slightly darker green foliage.
Direct sunlight becomes the plant’s nemesis. Those same leaves that bask happily in filtered light will develop unsightly brown scorch marks when exposed to harsh afternoon rays. It’s the botanical equivalent of a bad sunburn – painful to look at and entirely preventable. South or west-facing windows often prove too intense unless filtered through sheer curtains or positioned several feet away from the glass.
Light deprivation shows itself differently. A peace lily starved for photons will stretch its stems unnaturally, reaching for any available light source. The leaves may become smaller and paler, like faded versions of their former selves. Flowering becomes rare or stops altogether. I once kept a peace lily in a dim corner simply because it ‘looked nice there’ – within months, it became a shadow of its former self.
For light-challenged spaces, simple solutions exist. Rotate the plant weekly to ensure all sides receive equal attention. Consider supplementing with grow lights – the full-spectrum LED varieties work particularly well and won’t scorch leaves. I’ve had success with clip-on grow lights positioned about 12 inches above the foliage, set on a 12-hour timer to mimic natural daylight cycles.
The plant’s own behavior provides the best feedback. Observe how your peace lily responds to its current location over several weeks. New growth should emerge a healthy medium green – not too dark, not too light. Leaves should maintain their natural arch without excessive leaning. When you find that perfect spot where your plant looks vibrant yet relaxed, you’ve mastered the first lesson in peace lily care.
Watering: The Art of Less is More
Peace lilies have a quiet way of telling you what they need. Their leaves droop slightly when thirsty, springing back within hours after watering. This dramatic performance might tempt you to overwater, but restraint is key. These plants prefer consistent moisture without waterlogged roots.
The finger test remains the most reliable method. Push your index finger into the soil up to the second knuckle. If the soil feels dry at your fingertip, it’s time to water. During warmer months, this might mean weekly watering, while in winter you might stretch to ten days. The plant’s location affects this too – those near heaters dry out faster than ones in humid bathrooms.
Water quality matters more than many realize. Tap water often contains chlorine and fluoride that can cause brown leaf tips over time. Using filtered water solves this, but if that’s not practical, leave tap water in an open container overnight. This allows some chemicals to evaporate. Room temperature water prevents shocking the roots – no one enjoys an icy shower.
Drainage is non-negotiable. A pot without drainage holes turns into a swamp, suffocating roots. If you’ve fallen in love with a container lacking holes, create a drainage layer. Place pebbles at the bottom before adding soil, or use the pot as a decorative outer layer with a functional plastic pot inside. After watering, empty any excess water from saucers within thirty minutes.
The watering technique itself deserves attention. Pour slowly around the entire soil surface until water runs through the drainage holes. This ensures even moisture distribution. Morning watering allows excess moisture on leaves to evaporate during daylight, reducing fungal risks. If leaves get wet, gently shake the plant to prevent water pooling in the leaf joints.
Seasonal adjustments keep your peace lily thriving. Reduce watering frequency during winter dormancy, but don’t let the soil completely dry out. In summer, you might need to water more frequently, especially if the plant receives brighter light. Watch for curling leaves – they indicate underwatering, while yellow leaves often signal overwatering.
Humidity plays a supporting role in watering. High humidity means soil stays moist longer, while dry air accelerates evaporation. If your home has forced-air heating, you’ll need to check soil moisture more often. Grouping plants together creates a microclimate that reduces water loss from leaves.
Remember that peace lilies forgive occasional mistakes. If you forget to water and find a dramatically wilted plant, a thorough drink usually revives it within hours. Overwatered plants take longer to recover – sometimes requiring repotting in fresh soil. The key is observing your plant’s responses and adjusting your routine accordingly.
Humidity: Recreating a Tropical Oasis
Peace lilies whisper their tropical origins through their love for moisture-laden air. That slight droop in the leaves? Often it’s not thirst, but the plant’s quiet protest against dry indoor air.
The Pebble Tray Hack
For those who prefer low-tech solutions, a pebble tray works like a charm. Here’s how to create one:
- Select a shallow tray wider than your plant’s pot
- Spread a layer of clean pebbles or decorative stones
- Pour water until it reaches halfway up the stones
- Place your potted peace lily on top
The evaporating water creates a microclimate of humidity without risking root rot. Just remember to refresh the water weekly to prevent mosquito breeding.
Mist with Care
While misting seems intuitive, there’s an art to it:
- Use room-temperature filtered water to avoid leaf spots
- Target early morning sprays so leaves dry by nightfall
- Focus on the surrounding air rather than drenching foliage
Overzealous misting can invite fungal issues, especially in poorly ventilated spaces.
Humidifier Considerations
When investing in a humidifier, prioritize these features for peace lilies:
- Adjustable output: 40-60% humidity is ideal
- Cool mist: Prevents accidental leaf scalding
- Easy cleaning: Mineral buildup harms both machine and plant
Place the humidifier within 3 feet of your plant, but avoid direct airflow that might stress the leaves.
Air-Conditioned Survival Tactics
Modern climate control creates desert-like conditions. Combat this by:
- Grouping plants to create a shared humid zone
- Placing water bowls near heating/cooling vents
- Choosing terracotta pots that naturally regulate moisture
Watch for these signs your peace lily craves more humidity:
- Brown leaf tips despite proper watering
- Flowers that wither prematurely
- Leaves curling inward at the edges
The solution often lies not in watering more, but in helping the plant breathe the air it evolved to love. Wiping leaves monthly with a damp cloth removes dust that can clog pores, allowing better moisture absorption.
The Hidden Foundation: Soil and Fertilization Secrets
What happens beneath the surface determines everything above it. While we obsess over leaf shine and flower counts, the real magic of peace lily care occurs in that quiet space between root tips and soil particles. Getting this foundation right solves half your plant problems before they even begin.
The perfect potting mix feels like a crumbly chocolate cake when you squeeze it – moist but never soggy. Aim for equal parts peat moss and perlite, a combination that retains just enough water while letting excess drain freely. Those white specks of perlite aren’t just decoration; they create vital air pockets that prevent roots from drowning. When repotting, notice how commercial ‘all-purpose’ soils compact over time, becoming concrete-like around tender roots. Your peace lily will reward you for investing in a proper aroid mix with noticeably larger, glossier leaves.
Fertilization follows the rhythm of seasons rather than calendars. During active growth (typically March through September), a diluted balanced fertilizer every month keeps leaves dark green without risk of burn. I use half the recommended strength – these plants evolved in nutrient-poor forest floors and prefer gentle feeding. Come autumn, taper off gradually as growth slows; winter demands complete rest. Watch for crystalline deposits on soil surfaces or pot rims, telltale signs of mineral buildup from overfertilization that can damage roots.
When accidents happen (and they will – we’ve all poured that ‘little extra’ in hopeful moments), immediate action saves plants. Flood the pot with distilled water until it runs clear from drainage holes, essentially giving your peace lily’s root system an emergency detox. For severe cases, unpot the plant, gently rinse roots in room-temperature water, and replant in fresh mix. The leaves may droop dramatically afterward – this is normal shock, not a death sentence. Maintain ideal light and humidity while withholding fertilizer for at least eight weeks.
A curious thing happens when soil conditions are perfect: your peace lily becomes more forgiving of other care mistakes. Those notorious yellow leaves? Fewer appear. The dreaded dry spell between waterings? Less catastrophic. It’s as if the plant builds resilience from the ground up. Next time you admire those iconic white blooms, remember they’re really just the visible celebration of everything happening underground.
Pruning and Cleaning: The Art of Peace Lily Grooming
Keeping your peace lily looking its best isn’t just about survival—it’s about helping the plant thrive with dignity. Those elegant white spathes and glossy leaves deserve proper maintenance, and fortunately, the process is simpler than most people imagine.
The Right Way to Prune
When you notice a yellowing or completely brown leaf, it’s time for action. Use sharp, clean scissors and make your cut at a 45-degree angle about half an inch above the soil line. This angled cut prevents water from pooling on the fresh wound, reducing the risk of disease. If only the leaf tip is brown, you can trim just the damaged portion while preserving the healthy green tissue. Always follow the natural shape of the leaf when doing these partial trims.
For spent flowers, wait until the white spathe turns green and begins to wilt before removing the entire stalk at its base. This redirects the plant’s energy toward new growth rather than seed production. Regular deadheading often encourages more frequent blooming cycles.
The Leaf Cleaning Debate
Dust accumulation on peace lily leaves isn’t just unsightly—it actually blocks sunlight and reduces photosynthesis. While some enthusiasts swear by wiping leaves with diluted beer (claiming it adds shine), plain water works just as well without the sticky residue. Use a soft microfiber cloth dampened with room-temperature water, supporting each leaf from underneath with your free hand to prevent tearing.
For stubborn mineral deposits from hard water, mix one part distilled white vinegar with four parts water. Test this solution on a single leaf first and wait 48 hours to check for adverse reactions before proceeding with full cleaning. Never use commercial leaf shine products, as they can clog the plant’s pores.
Tool Hygiene Matters
Disinfect your pruning tools before and after each use to prevent spreading pathogens. Rubbing alcohol (70% isopropyl) applied with cotton pads works perfectly. Wipe down both the blades and handles, paying special attention to joints where plant debris might accumulate. For stubborn sap residue, a toothbrush dipped in alcohol can scrub those hard-to-reach spots.
Keep a dedicated pair of scissors just for plant care—using the same tool for packaging and plants is how infections spread. Store them dry in a clean container between uses. If you notice any rust developing, replace the tool immediately as corroded metal can introduce harmful bacteria to fresh cuts.
Seasonal Considerations
Spring is the ideal time for major pruning when the plant enters its active growth phase. During winter dormancy, limit pruning to only absolutely necessary removal of dead material. Always water your peace lily a day before significant pruning to reduce stress. If you’ve had to remove multiple leaves at once, consider moving the plant to slightly lower light conditions for a week while it recovers.
Remember that occasional leaf loss is normal—older leaves naturally yellow and die as new ones emerge. As long as your plant is producing healthy new growth, don’t panic over a few aging leaves retiring with dignity.
Troubleshooting Your Peace Lily: A Symptom-Based Guide
Peace lilies communicate their needs through physical changes. When something’s off, they’ll show clear signs of distress. Here’s how to decode those signals and nurse your plant back to health.
Leaf Tips Turning Brown or Black
What you see: Crispy brown edges or blackened tips, often starting at the leaf’s extremity.
Likely culprits:
- Low humidity (most common)
- Fluoride or chlorine sensitivity from tap water
- Salt buildup from over-fertilizing
First aid:
- Trim the damaged tips at a 45-degree angle using sterilized scissors
- Switch to filtered or distilled water immediately
- Place the pot on a humidity tray – just a shallow dish filled with pebbles and water
- Flush the soil by letting water run through it for 2-3 minutes to remove salt deposits
Prevention: Maintain 40-60% humidity around your plant. Group it with other humidity-loving plants to create a microclimate.
Entire Leaves Turning Yellow
What you see: Uniform yellowing of whole leaves, usually starting from the lower foliage.
Likely culprits:
- Overwatering (the plant equivalent of drowning)
- Poor drainage leading to soggy roots
- Natural aging (if only 1-2 older leaves yellow monthly)
First aid:
- Stop watering and let the soil dry completely
- Check roots – gently remove the plant to inspect for brown, mushy roots
- Prune damaged roots with clean shears
- Repot in fresh, well-draining mix if root rot is present
Prevention: Adopt the ‘finger test’ – only water when the top two inches of soil feel dry. Ensure your pot has functional drainage holes.
Lack of Flowers
What you see: Healthy foliage but no white blooms for months.
Likely culprits:
- Insufficient light (the most overlooked factor)
- Over-fertilizing with high-nitrogen formulas
- Plant stress from temperature fluctuations
First aid:
- Gradually move to a brighter location with indirect light
- Switch to a balanced fertilizer (equal NPK numbers)
- Maintain consistent temperatures between 65-80°F (18-27°C)
Prevention: Peace lilies need about 400 foot-candles of light to bloom – roughly what an east-facing windowsill provides. A light meter app can help measure this.
Drooping or Wilting
What you see: Leaves losing turgidity, stems bending dramatically.
Likely culprits:
- Underwatering (most common)
- Rootbound conditions
- Sudden temperature drops
First aid:
- Water thoroughly until excess drains out
- If the plant perks up within hours, you’ve confirmed thirst
- For chronic wilting, check if roots are circling the pot’s interior
Prevention: Establish a consistent watering rhythm. These dramatic plants will visibly droop when thirsty, making them excellent ‘self-watering indicators.’
Brown Spots on Leaves
What you see: Irregular brown patches, sometimes with yellow halos.
Likely culprits:
- Sunburn from direct light exposure
- Fungal or bacterial infections
- Cold damage from drafts
First aid:
- Remove affected leaves to prevent spread
- Isolate the plant if infection is suspected
- Apply a diluted neem oil solution for fungal issues
Prevention: Keep leaves dry when watering, and maintain good air circulation without exposing the plant to cold drafts.
Quick Reference Chart
| Symptom | Probable Causes | Immediate Actions | Long-Term Fixes |
|---|---|---|---|
| Brown leaf tips | Low humidity, chemical burn | Trim, switch to filtered water | Use humidity tray |
| Yellow leaves | Overwatering, root rot | Stop watering, check roots | Improve drainage |
| No flowers | Low light, improper feeding | Move to brighter spot | Use bloom-booster fertilizer |
| Sudden wilting | Underwatering, rootbound | Soak pot, check root space | Establish watering schedule |
| Brown leaf spots | Sunburn, infection | Remove damaged leaves | Adjust light exposure |
Remember: Plants recover slowly. After implementing fixes, allow 2-3 weeks to see improvement. Sometimes the healthiest approach is to prune damaged growth and let the plant redirect energy to new leaves. Your peace lily’s resilience might surprise you.
Safety and Beyond: Keeping Beauty Without Risk
That glossy white bloom and deep green leaves make peace lilies irresistible as houseplants. But behind their elegant appearance lies a less discussed truth – every part of the plant contains calcium oxalate crystals. When I first learned this after adopting a kitten, it changed how I positioned my favorite floor-standing specimen.
The ASPCA lists peace lilies as toxic to both cats and dogs, with recorded cases of oral irritation, excessive drooling, and difficulty swallowing. Unlike true lilies that cause kidney failure, peace lily poisoning rarely proves fatal but creates intensely uncomfortable symptoms. My veterinarian friend described it as “having microscopic needles stuck in your mouth” – hardly what anyone wants for their curious pets.
If ingestion occurs, resist the instinct to induce vomiting. Those sharp crystals can cause secondary damage coming back up. Instead:
- Remove any plant material from the mouth
- Offer milk or yogurt to soothe irritated tissues
- Contact your vet or poison control immediately
Having the plant’s scientific name (Spathiphyllum spp.) ready helps professionals provide targeted advice.
For households with determined plant-chewers, consider these safer alternatives that offer similar tropical vibes:
- Boston fern: Thrives in identical low-light conditions with non-toxic, feathery fronds
- Parlor palm: Pet-safe vertical accent for behind sofas where peace lilies typically reside
- African violet: Provides floral color without risk when placed on high shelves
What surprised me most was discovering many plant lovers successfully keep peace lilies in homes with pets through strategic placement. Mine now lives in a wall-mounted macrame hanger near the ceiling – visible but unreachable. The key lies in understanding your animal’s behavior; some cats ignore plants completely while puppies explore everything with their mouths.
That distinctive white bloom still makes the precautions worthwhile for me. By implementing simple safety measures like elevated positioning and training pets with deterrent sprays, we can enjoy these classic plants responsibly. Just always have your vet’s emergency number saved, because even the most careful pet parents can’t watch those furry troublemakers every second.
Final Checklist: Keeping Your Peace Lily Thriving
Before we part ways, let’s consolidate everything into five critical mistakes you’ll want to avoid. These aren’t just tips—they’re the difference between a flourishing peace lily and one that struggles to survive.
1. Never place your plant in direct sunlight
That sunny windowsill might seem perfect, but peace lilies interpret harsh light as aggression. Their leaves develop brown scorch marks as distress signals. If your space only has south-facing windows, use sheer curtains to diffuse the light.
2. Don’t let the soil dry out completely
These plants originate from tropical rainforest floors where moisture is constant. When the top inch of soil feels dry, it’s time for a drink. Forgetful waterers might benefit from setting weekly calendar reminders until the routine becomes instinctive.
3. Avoid using untreated tap water
The minerals in hard water accumulate in the soil, causing leaf tips to turn brown. If buying distilled water seems excessive, try leaving tap water uncovered for 24 hours—this allows some chemicals to evaporate. Rainwater collected in clean containers works wonderfully too.
4. Never skip humidity maintenance
Dry air makes peace lilies go limp faster than forgotten lettuce. Grouping plants together creates a microclimate, while pebble trays provide constant evaporation. In winter when heaters run constantly, even diligent misting might not be enough—consider a small desktop humidifier.
5. Don’t ignore the toxicity warning
Those elegant white flowers contain calcium oxalate crystals that cause mouth irritation if ingested. Keep plants on high shelves or in hanging baskets if you have curious pets or toddlers. For households with persistent plant-chewers, spider plants make excellent non-toxic alternatives.
Now that you’re equipped with these safeguards, I’d love to see how your peace lily adapts to its new care routine. Share photos of your plant’s progress—especially if you’ve found creative solutions to common problems. Maybe you’ve discovered the perfect north-facing nook, or perhaps you’ve trained your cat to ignore houseplants (if so, please teach us your ways!).
A quick but important note: While I’ve shared best practices from years of indoor gardening, always consult a medical professional or poison control center immediately if plant ingestion occurs. Your local nursery staff can also provide region-specific advice tailored to your home environment.
Here’s to many years of lush, flowering peace lilies gracing your living space—may your leaves stay perky and your watering can never run dry.