It started as an ordinary Tuesday night. I shuffled into the kitchen for a late-night snack, barefoot and half-asleep, when suddenly—squelch. My foot landed in a cold puddle that definitely shouldn’t be there.
Adrenaline hit me like a bucket of ice water. I yanked open the sink cabinet, expecting to see Niagara Falls gushing from the pipes, but everything was bone dry. That’s when the splashing sounds led me to the utility closet, where my water heater’s pressure relief valve had transformed into a miniature geyser, spraying arcs of water across the floor with impressive hydraulic force.
In that moment, three thoughts raced through my mind:
- Why is my supposedly sealed water heater suddenly redecorating my floor?
- How do I stop this indoor monsoon before it reaches the electrical outlets?
- When did I last check my homeowner’s insurance policy?
After performing what can only be described as a panic-driven interpretive dance (involving towels, a mixing bowl, and some creative swearing), I managed to shut off the water supply and assess the damage. The scene looked like a failed science experiment—steam rising from wet laundry, warped laminate flooring, and that ominous dripping sound that makes your wallet ache.
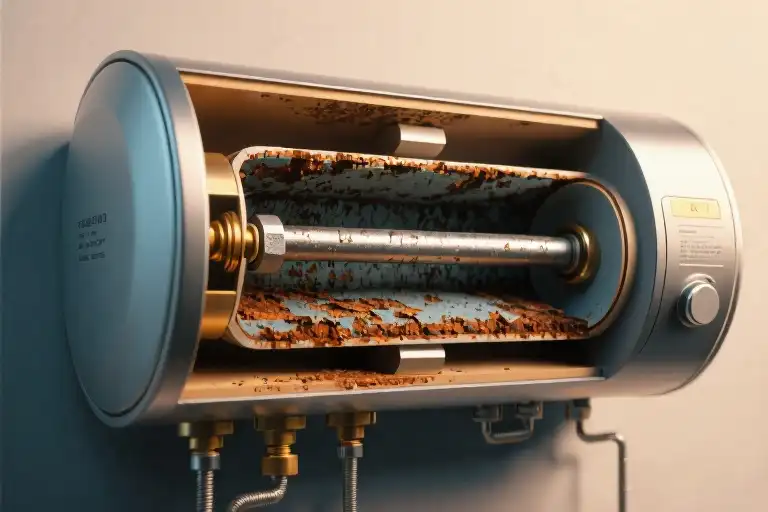
Here’s what every homeowner should know about that terrifying moment when your water heater decides to redecorate. That pressure valve isn’t malfunctioning—it’s doing exactly what it’s designed to do when something goes wrong inside the tank. Like a canary in a coal mine, it’s screaming a warning about a hidden hero that’s been silently taking bullets for your household: the humble anode rod.
Buried inside your water heater, this unsung sacrificial lamb attracts all the corrosive elements in your water—the rust, the minerals, the electrochemical reactions that want to eat through metal. It’s essentially taking one for the team every time you enjoy a hot shower. But when this rod gets depleted (and they all do eventually), your tank starts corroding from the inside out, pressure builds up, and suddenly you’ve got an impromptu water feature in your utility room.
The real kicker? Most homeowners don’t even know this critical component exists until their floors are underwater. We diligently change air filters and clean dryer vents, yet ignore the metal rod that’s literally preserving our water heaters’ lifespan. It’s like changing your car’s oil but never rotating the tires—eventually, something’s going to give.
So if you’re standing in a puddle wondering why your water heater is leaking from the pressure valve, take heart. You’re not dealing with some mysterious plumbing voodoo—you’re witnessing the final act of a years-long chemical process that’s entirely preventable. And the solution might be simpler (and cheaper) than you think.
Emergency Response: 3 Steps to Stop a Water Heater Leak
Step 1: Locate and Shut Off Water Sources
When your water heater starts leaking from the pressure valve pipe, speed is crucial. Here’s where to cut the supply:
- Main Shutoff Valve: Usually located where the main water line enters your home (basement/crawlspace). Turn clockwise until tight.
- Water Heater Cold Water Inlet: Found atop the tank (red or blue handle). This stops new water entering the leaking system.
- Circuit Breaker: For electric heaters, flip the dedicated breaker to prevent dry-fire damage.
Pro Tip: Mark these locations with glow-in-the-dark tape now—you’ll thank yourself during midnight emergencies.
Step 2: Damage Control for Existing Water
While the pressure valve spews water, minimize damage with these household items:
- Towel Fortress: Wrap towels around the valve base to redirect flow into a bucket (angle towels downward like a ramp)
- Wet/Dry Vacuum: If water pools near electrical outlets, use vacuum suction instead of mopping
- Baking Soda Barrier: Sprinkle around wet areas to prevent slippery surfaces and absorb odors
Warning: Never place containers directly under a spraying pressure valve—the force can topple them.
Step 3: Pressure Valve Troubleshooting
After stopping active leaks:
- Test Valve Function: Lift the valve’s trip lever halfway—water should dribble out. If nothing comes out or it won’t reset, replacement is needed.
- Temperature Check: Feel the leaking pipe. Scalding hot water indicates dangerous pressure buildup (over 150°F).
- Drain Sediment: Attach a garden hose to the tank’s drain valve (bottom) and flush until water runs clear.
Key Insight: A temporarily stopped leak doesn’t mean the problem is solved. 80% of pressure valve leaks signal internal corrosion issues.
Transition to Root Cause Analysis
“With the flood contained, I stared at my now-silent water heater. That pressure valve didn’t just fail—something provoked it. Time to play appliance detective…”
The Silent Saboteur: How Your Water Heater is Being Destroyed from Within
That frantic moment when water gushes from your pressure valve isn’t just bad luck—it’s the final cry for help from an internal guardian you probably didn’t know existed. Let’s pull back the curtain on what’s really happening inside your water heater.
The Unsung Hero: Your Anode Rod’s Secret Life
Buried inside every water heater tank lies a slender metal rod, quietly performing what engineers call “sacrificial protection.” Picture this unassuming component as your appliance’s personal bodyguard, deliberately drawing all corrosive elements toward itself through electrochemical reactions. While the science behind it involves galvanic corrosion and ion exchange, here’s what truly matters:
- The magnesium or aluminum rod attracts minerals and rust particles like a magnet
- Electrons flow from the rod to the tank walls, creating a protective current
- Gradual erosion shows it’s working—until nothing remains to sacrifice
Corrosion Timeline: The Invisible Countdown
- Year 1: A new anode rod stands proud, its surface smooth. Water chemistry determines its fate—hard water accelerates deterioration up to 3x faster.
- Year 3: Pitted and uneven, the rod now resembles a chewed pencil. This is when many heaters develop subtle symptoms:
- Metallic tasting water
- Rumbling noises during heating cycles
- Reduced hot water capacity
- Year 5: In areas with high mineral content, the rod may be completely consumed. Without this protection, your tank’s steel lining becomes the next target.
The Domino Effect of Neglect
When the anode rod fails completely, the damage cascade begins:
- First casualties: Rubber seals and gaskets degrade from increased corrosion
- Hidden damage: Microscopic tank perforations develop, often unnoticed until leaks appear
- System overload: Pressure valves work overtime, leading to the very leaks that send homeowners into panic mode
A startling statistic from the Water Quality Association reveals: 83% of premature water heater failures stem from depleted anode rods. Yet most replacement units ship with rods rated for only 3-5 years of service—a disconnect that costs consumers millions annually.
Spotting the Signs Before Disaster Strikes
You don’t need to wait for flooding to catch problems early. Watch for these subtle warnings:
- The Bubble Test: Tiny gas bubbles collecting on faucet aerators indicate active corrosion
- The Hot Water Smell Test: A metallic or sulfur odor suggests deteriorating components
- The Towel Check: Wipe the pressure valve discharge pipe—rust-colored residue means trouble
Pro tip: Annual maintenance during daylight hours lets you inspect components without emergency stress. Keep a flashlight, adjustable wrench, and white towel in your water heater kit for quick diagnostics.
Remember: That mysterious leak wasn’t random—it was your water heater’s final distress signal. By understanding the silent battle waged by your anode rod, you’ve taken the first step from reactive panic to proactive protection.
DIY Health Check for Your Water Heater
That moment when you realize your water heater might be silently suffering is enough to make any homeowner uneasy. But here’s the good news: you don’t need to be a plumbing expert to give your water heater a quick health check. With just a few household items and about five minutes, you can become your appliance’s first line of defense.
The Magnet Test: Your Corrosion Detective
Grab a refrigerator magnet (the stronger the better) and head to your water heater. This simple tool can reveal what’s happening inside your tank without any disassembly. Here’s how it works:
- Locate the drain valve at the base of your water heater
- Place a shallow container beneath the valve
- Slowly open the valve just enough to let a cup of water flow out
- Dip your magnet into the collected water
If the magnet collects gritty particles or small metal flakes, your anode rod is likely corroding. These particles are essentially pieces of your sacrificial anode rod doing its job – but if there’s excessive debris, it’s crying for attention.
Listen to Your Water Heater’s Story
Your appliance communicates through sounds most of us ignore. Try this diagnostic trick:
- Early morning check: When the house is quiet, stand near your water heater as it cycles on
- Normal sounds: A soft hum or gentle gurgling
- Warning signs:
- Popping or cracking noises (mineral buildup at the bottom)
- High-pitched whining (sediment in valves)
- Loud bangs (serious sediment accumulation)
I keep a voice memo app ready to record unusual sounds – it’s helped me catch two potential issues before they became emergencies.
Water Quality Tells All
Your morning shower water holds clues about your water heater’s health. Keep an eye out for:
- Discoloration: Rusty or yellowish tint (corrosion inside tank)
- Metallic taste: Especially noticeable in hot beverages
- Sulfur smell: Rotten egg odor indicates bacteria reacting with anode rod
For precise testing, affordable water test strips (available at hardware stores) can measure:
- pH levels (ideal range 6.5-8.5)
- Total dissolved solids (TDS)
- Chlorine content
When to Call for Backup
While these DIY checks are incredibly useful, certain red flags mean it’s time to call a professional:
⚠️ Visible moisture on the tank exterior
⚠️ Persistent leaks after valve adjustments
⚠️ No hot water despite normal operation sounds
⚠️ Severe discoloration that doesn’t clear after flushing
Remember: The $20 you might spend on a service call could prevent $1,000+ in water damage or premature tank replacement. I learned this the hard way when I ignored subtle signs that eventually led to a full tank replacement.
Your 5-Minute Maintenance Calendar
Mark these recurring tasks in your phone:
- Monthly: Quick visual inspection, listen for unusual sounds
- Quarterly: Magnet test and water quality check
- Annually: Full sediment flush (takes about 30 minutes)
Pro tip: Set reminders right after daylight saving time changes – easy to remember and spreads maintenance throughout the year.
Next time you’re waiting for your coffee to brew, take those extra minutes to give your water heater some love. These simple checks could add years to your appliance’s life and save you from unexpected cold showers (and expensive repairs).
$20 for 10 More Years: Your Water Heater’s Secret Lifesaver
That frantic kitchen flood taught me one of homeownership’s best-kept secrets: a humble metal rod can mean the difference between a $20 fix and a $1,200 water heater replacement. Let’s talk about giving your appliance a decade-long bonus round.
The Anode Rod Starter Kit
You’ll need just three things for this life-extending surgery:
- Replacement anode rod ($15-$50) – Magnesium rods work best for most homes, but aluminum/zinc hybrids are better for smelly water issues
- 1-1/16 inch socket wrench ($8) – The weird size most toolkits don’t include
- Pipe tape ($2) – For resealing threads (look for the pink ‘water heater’ version)
Pro tip: Buy an extended-length rod – many modern heaters have cramped tops making standard rods impossible to remove. The FlexiAnode bendable version solves this.
Hard Water Survival Guide
If your tea kettle looks like it’s growing a snow globe, your anode rod is fighting a losing battle. Hard water areas (looking at you, Texas and Midwest) need special care:
- Inspect annually instead of every 3 years
- Choose zinc-aluminum rods – they withstand mineral attacks better
- Flush your tank every 6 months to reduce sediment
- Consider a water softener if you see white crust on fixtures
Fun fact: The anode rod in hard water can corrode 3x faster. That’s like running a marathon in lead shoes.
What Repair Companies Won’t Tell You
When a technician says “your whole tank needs replacing,” ask these questions first:
- “Can we check the anode rod?” (70% of ‘failed’ heaters just need this $20 part)
- “Is there actual tank leakage?” (Surface condensation often gets misdiagnosed)
- “What’s the manufacture date?” (The serial number’s first 4 digits – most heaters last 12+ years with maintenance)
Most big-box stores profit from full replacements. Independent plumbers often suggest cheaper fixes – I found one who replaced my rod for $85 including parts when a national chain quoted $1,100 for a ‘failed system.’
The Math That Changes Minds
Let’s break down why this matters:
| Scenario | Cost | Lifespan Impact |
|---|---|---|
| No maintenance | $0 | 6-8 years |
| Annual anode checks | $20/year | 12-15 years |
| Full replacement | $800-$1,500 | Another 6-8 years |
That’s potentially doubling your heater’s life for less than two lattes a year. The anode rod isn’t just a part – it’s an insurance policy against cold showers and wallet-freezing emergencies.
Your Weekend Warrior Challenge
Block 30 minutes this Saturday for this:
- Locate your water heater’s model number
- Google “[model number] anode rod replacement video”
- Watch while sipping coffee – you’ll realize it’s easier than assembling IKEA furniture
Remember: Homes don’t come with instruction manuals, but now you’ve got the cheat codes.
The Unsung Heroes in Your Home: Maintenance Blind Spots You Should Know
While we’ve just uncovered the critical role of your water heater’s anode rod, this “sacrificial guardian” concept isn’t unique. Many household appliances contain similar hidden components designed to protect more expensive parts. Recognizing these can save you thousands in premature replacements.
1. Air Conditioner: The Condenser Coil’s Silent Battle
That outdoor AC unit isn’t just noisy—it’s engaged in constant warfare against dirt and debris. The condenser coil (that metallic grid behind the fins) acts like your appliance’s lungs, expelling heat from your home. When clogged:
- Energy efficiency drops 30% (EPA data)
- Compressor failure risk triples
- Cooling capacity diminishes gradually
DIY Maintenance:
- Annual Cleaning: Use a fin comb and coil cleaner spray (avoid pressure washers)
- 2-Foot Clearance Rule: Trim plants near the unit
- Winter Protection: Cover with breathable fabric (never plastic)
Pro Tip: Listen for ‘hissing’ sounds—this often indicates refrigerant leaks from corroded coils.
2. Washing Machine: The Mold Magnet You Never See
Behind that shiny drum lurks a damp underworld:
- Detergent drawer mold (remove and soak in vinegar monthly)
- Door seal biofilm (wipe with baking soda paste after each load)
- Drain pump filter (clean quarterly to prevent sewage backups)
Shocking Stat: 83% of front-loaders develop mold within 2 years (Consumer Reports).
5-Minute Rescue Routine:
- Leave the door/drawer open after use
- Monthly ‘clean tub’ cycle with 2 cups white vinegar
- Replace rubber gaskets showing black spots
3. Refrigerator: The Dusty Assassin
Your fridge’s condenser coils (usually at the back/bottom) collect dust like a magnet. Every 0.1” of dust buildup:
- Increases energy use by 5%
- Reduces cooling efficiency
- Shortens compressor life
Tool-Free Maintenance:
- Vacuum coils every 3 months (use crevice tool)
- Check door seals with the dollar bill test
- Defrost freezer before ice exceeds ½” thickness
Why This Matters
Like the anode rod in your water heater, these components follow a “sacrificial design” philosophy. Manufacturers expect you to replace:
- $15 door gaskets instead of $1,200 washing machines
- $40 condenser coils rather than $900 AC units
- $8 refrigerator filters not $2,000 appliances
Final Thought: Schedule bi-annual “appliance checkup days”—your future self (and wallet) will thank you when these silent guardians fail gracefully rather than catastrophically.
From Panic to Control: You’re Now Your Water Heater’s Guardian
That moment of soggy socks and heart-pounding panic? It’s behind you now. What started as a midnight kitchen flood transformed into something far more valuable—the knowledge to protect your home from future water heater disasters. You’ve graduated from helpless observer to empowered guardian of your appliances.
The Transformation Journey
Remember your initial reaction when water sprayed across the utility room? Most homeowners share that same visceral panic when facing unexpected leaks. But through this experience, you’ve gained:
- Emergency response skills: The quick-thinking ability to shut off water valves with muscle memory
- Mechanical empathy: Understanding your water heater’s sacrificial anode rod defense system
- Preventive vision: Spotting early warning signs before they become basement floods
This knowledge puts you in the top 10% of homeowners who actually understand what’s happening inside that metal tank in your utility room.
Your New Maintenance Superpowers
With great plumbing knowledge comes great responsibility. Here’s how to wield your new expertise:
- Annual anode rod checkups: Mark your calendar every 12 months for a quick inspection (takes less time than brewing coffee)
- Water quality awareness: Notice rusty water? That’s your anode rod sending an SOS
- Pressure valve testing: Make it part of seasonal home maintenance along with smoke detector batteries
Consider printing a simple maintenance checklist to stick on your water heater. The 5 minutes you’ll spend quarterly could prevent thousands in water damage repairs.
Join the Prepared Homeowners Club
You’re not alone in this journey. Thousands have faced similar emergencies and emerged wiser. Share your story in the comments—what was your “soggy sock moment” with home appliances? Your experience might help another panicked homeowner right when they need it most.
Was it:
- The washing machine that flooded the laundry room?
- The refrigerator line that turned your kitchen into a skating rink?
- Or like mine, the innocent-looking water heater that staged a midnight rebellion?
Every shared story makes our collective home maintenance knowledge stronger. And remember—that initial panic you felt? It’s now transformed into quiet confidence. You’ve got this.
“The difference between a disaster and an inconvenience is preparation.” – Your newly empowered self, tomorrow morning
Where to Go From Here
Your water heater maintenance journey has just begun. Consider exploring:
- Whole-home water protection: Smart leak detectors that text you before puddles form
- Appliance longevity secrets: How to extend the life of your washer, dryer, and HVAC system
- DIY plumbing confidence: Basic skills every homeowner should master
Bookmark this page—you’ll want these tips when helping friends through their first home maintenance panic. Because now, you’re not just a homeowner—you’re the knowledgeable neighbor everyone wishes they had.